Introduction to the GNU toolchain for embedded ARM
TUTORIAL0002 - Revision AOverview
This tutorial will give an introduction to using the GCC toolchain for developing embedded firmware on ARM processors. We will cover where to get the required tools and create a simple program.
Prerequisites
If you are new to the GCC toolchain then I'd recommend that you take a few minutes to have a look at the Introduction to the GNU toolchain tutorial and head back to get started on developing for ARM.

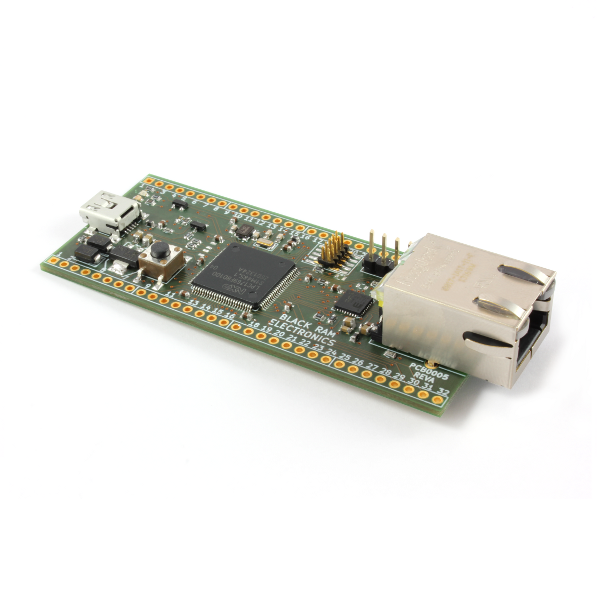
To get the most out of this tutorial I recommend that you have an ARM processor and a way of loading your application onto it. I have used our BR-LPC1769-Ethernet development board and our USB to serial converter to program it. This is a low cost yet relatively powerful board that you can quickly start with and expand. The board features an ARM Cortex-M3 manufactured by NXP. It can operate at speeds of up to 120MHz, has 512kB of internal flash and 64kB of RAM.

What is an ARM processor?
The ARM processor architecture is designed by ARM Holdings in the UK. There are a number of ARM core designs with the newest designs having the prefix of Cortex. ARM do not manufacture processors themselves but licence the designs to third parties that combine the core with their own peripherals and memory to produce a finished processor. This means that there are a large number of manufactures that are producing ARM based processors. There is plenty of material available online for further reading.
Let's get started
Due to the open-source nature of the GCC toolchain it has been ported to a number of processors including ARM. This means that everything you have learned about GCC is true for ARM GCC.
ARM GCC is a project supported by ARM to provide high quality development tools that are well maintained and regularly updated. It is fully cross-platform (Linux/Windows/Mac) and free of change. What's not to like!
Installing arm-gcc
Head over to the gcc-arm page and download the installer for your operating system (Windows/Linux/Mac). If you are using the latest version of Ubuntu you can use the Ubuntu software centre, just search for “gcc-arm-none-eabi” or from the command line:
// Check for updates
$ sudo apt-get update

// Upgade
$ sudo apt-get upgrade

// Install gcc-arm
$ sudo apt-get install gcc-arm-none-eabi
For other operating systems follow the installation instructions provided.
Testing our installation
To check that our installation has worked and that our system is correctly configured, type the following into your terminal:
> arm-none-eabi-gcc –version
This should print out version information for ARM GCC.
If this does not work then double check your installation and that the install directory has been added to your path. You might need to reboot after changing the PATH variable.
What else do we need?
Producing an application for an embedded processor is not as straight forward as for a PC because we require a number of additional files. These files are provided in the download that accompanies this tutorial.
Let's take a closer look at these files:
- Make files: The make file automates the build process. In the download there are two make files. One is the main make file and the "makefile.conf" provides configuration information.
- Linker scripts: The linker needs to know where the RAM and Flash memory is in our processor so that it can correctly place the code. "gcc.ld" is the main linker file that pulls information from the files in the "ldscripts" directory.
- Startup: The startup file is a code file that handles the initialisation of the processor, including setting the memory to a known state and calling the main function.
- Core M3: Processor specific functions that are needed.
- LPC17xx.h: Provides access to the peripheral registers of the processor.
- System LPC17xx: System functions that handle the likes of setting up the core clocks.
You can use the files in this project to start any new development in a hassel free way.
Let's make our first embedded ARM application
The source code and all supporting files can be downloaded here. Or you can access the files through GitHub.
This simple application is a classic “blinky” program. Like the “Hello World” program on a PC, this is a minimal application that tests our toolchain. The blinky program flashes an LED indefinitely to show the processor is running. This is always a good place to start a new development.
The source code is as follows:
#include "LPC17xx.h"
#include "system_LPC17xx.h"

volatile uint32_t msTicks = 0; // counter for 1ms SysTicks

//====================================================================================
void main()
{
	uint32_t timer_mark;

	// Init on-board LED as output
	GPIO1->FIODIR |= 1 << 18;

	// Init SysTick
	SysTick_Config(SystemFrequency / 1000);		// Generate interrupt every 1 ms

	for (;;)
	{
		timer_mark = msTicks;			// Take timer snapshot
		while(msTicks < (timer_mark + 100));	// Wait until 100ms has passed
		GPIO1->FIOCLR = 1 << 18;		// Turn the LED off

		timer_mark = msTicks;			// Take timer snapshot
		while(msTicks < (timer_mark + 100));	// Wait until 100ms has passed
		GPIO1->FIOSET = 1 << 18;		// Turn the LED on
	}
}

//====================================================================================
void SysTick_Handler(void)
{
	msTicks++;
}
To build the application on Linux or from the Cygwin terminal type:
$ make
To build using MinGW in Windows you will need to type:
> mingw32-make
The above commands will invoke the make application that will use the make file provided.
Programming the processor
Now we need to load the application into the flash memory of our processor. There are a number of interfaces that can be used:
- JTAG
- SWD
- In system programming (ISP)
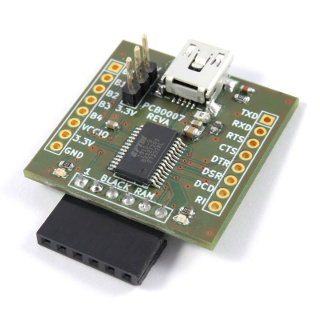
In this tutorial we are going to use ISP as it's the simplest and the cheapest method. We're going to use our FT232L breakout board that gives us 3.3V UART along with a pair of control lines that are needed.

The ISP program we are going to use to load our binary file in to the processor is lpc21isp. This can be downloaded here. This application needs to be built. Simply run make on the downloaded directory or refer to the readme for more information.
The application needs a number of command line arguments to configure it. Here is an example that you can use to get started:
lpc21isp -wipe -bin -control LPC1769-Blinky-CM3.bin com10 57600 12000
Let's have a look at the arguments used:
| -wipe | Erase the processor before programming. |
| -bin | Indicate we are using a binary file. |
| -control | Use the control lines to put the processor in ISP mode. |
| LPC1769-Blinky-CM3.bin | The binary file to use. |
| com10 | The comm port for communication. |
| 57600 | Serial communication baud rate. |
| 12000 | Speed of the target board's main oscillator. |
It's likely that all you will need to change is the comm port that has been assigned to your FT232 device.
Connect the boards as shown in the picture above and enter the command shown in the example above.
Once the programming is complete the target will start running. If all has gone to plan you should now have an LED flashing. Congratulations!
Summing up
The has been a simple introduction to producing firmware for ARM processors. The blinky program is a good place to start any application because it gives you a minimal working application you can build on.
Watch this space for more embedded tutorials coming soon.
Feedback
If you have any feedback, would like more information or would like to see a tutorial that we do not currently have then please contact us at info@blackramelectronics.com.
Or if you prefer you can contact us directly using the following form.
An e-mail address is required by this form, although if you do not wish for a reply then feel free to input noreply@yoursite.com.


